Custom Book Cover Calculator

This is a more advanced technical tool and guide is to help calculate cover spines for perfect bound and hardcover books. If you’re already an advanced print designer or if you’re looking to become a more proficient print designer, then this tool is for you. Feel free to take a look at our how-to guide right after the calculator. We strongly encourage using InDesign to create these elements. We’ll start by explaining the elements needed, and then we’ll introduce the calculator.

Do you have to use this tool?

This tool is helpful if you want to create a cover where you have most design control. If you send us your files we can create the cover for you but it won’t have a spine since that would require a separate element. This tool is specifically required if you want to place an order on our Nonstop Docs online portal for lower pricing and quicker turnarounds. If you’re not sure, feel free to email us.

Either way, make sure to stop by our Interior Page Setup Guide, as we would consider this more critical to your project’s overall success. 

The Elements Needed to Design your Cover

This calculator is designed to use in Adobe Indesign to make perfect custom book covers for perfect binding and hardcover case binding. 


The elements on the right are needed to properly calculate the dimensions and spine of your cover. 

Once you have these elements, you’re ready to plug in the numbers into the calculator.


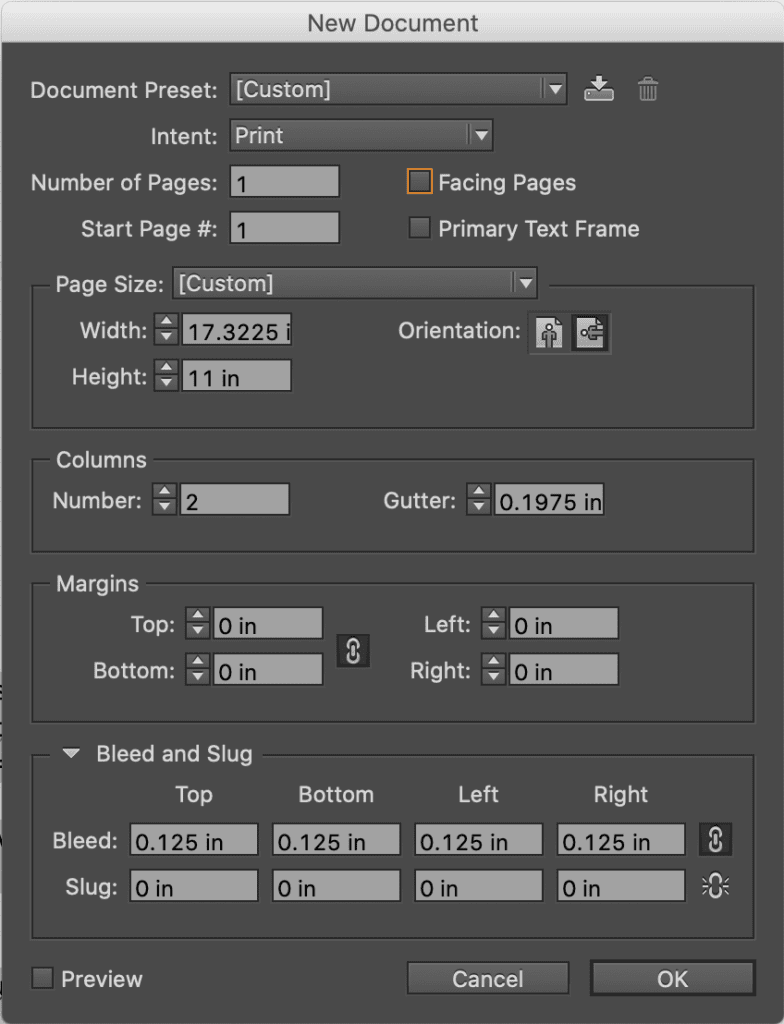
Page count can be a confusing topic. We consider 1 page to be a numbered page like in a novel. Before you use the calculator, confirm your page count using our method. If you’re printing a single sided document, include your blank pages when using this tool because that’s still included within the content of your book.

We measure page thickness in inches. You’ll see a lot of paper companies measure thickness in points (pts). To convert that into inches just divide the number by 1000. For example, 4.9points (pts) = .0049.

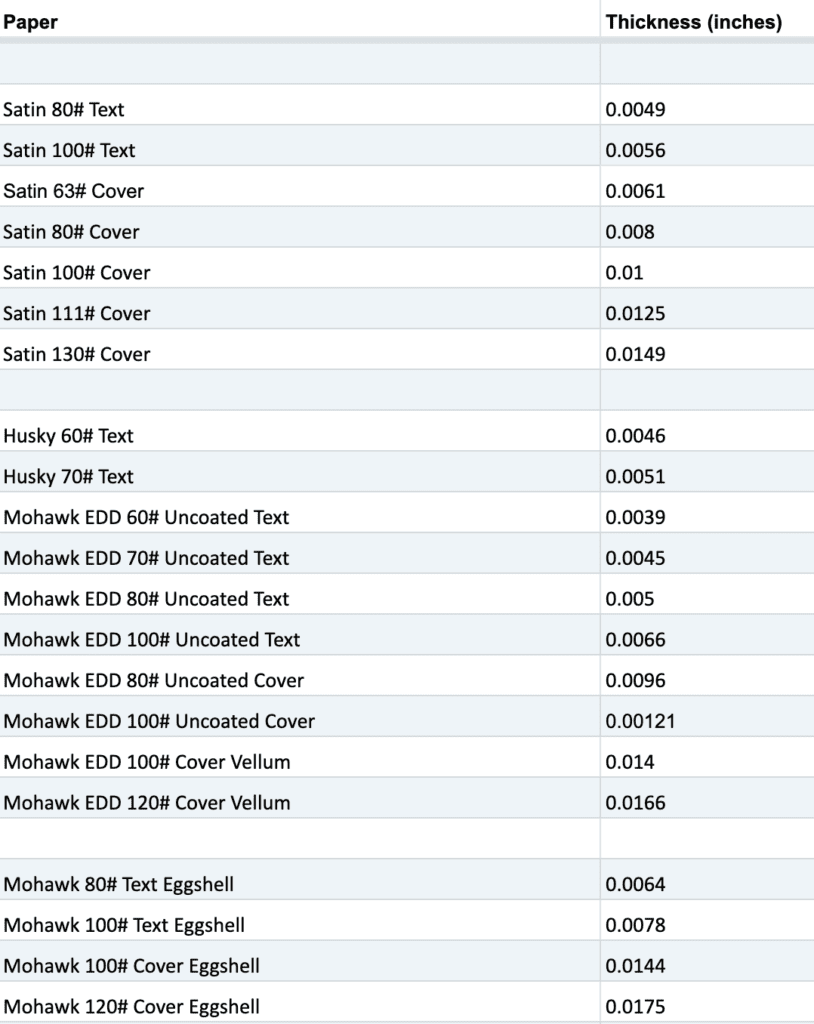
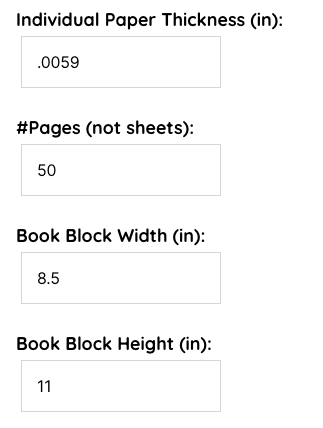
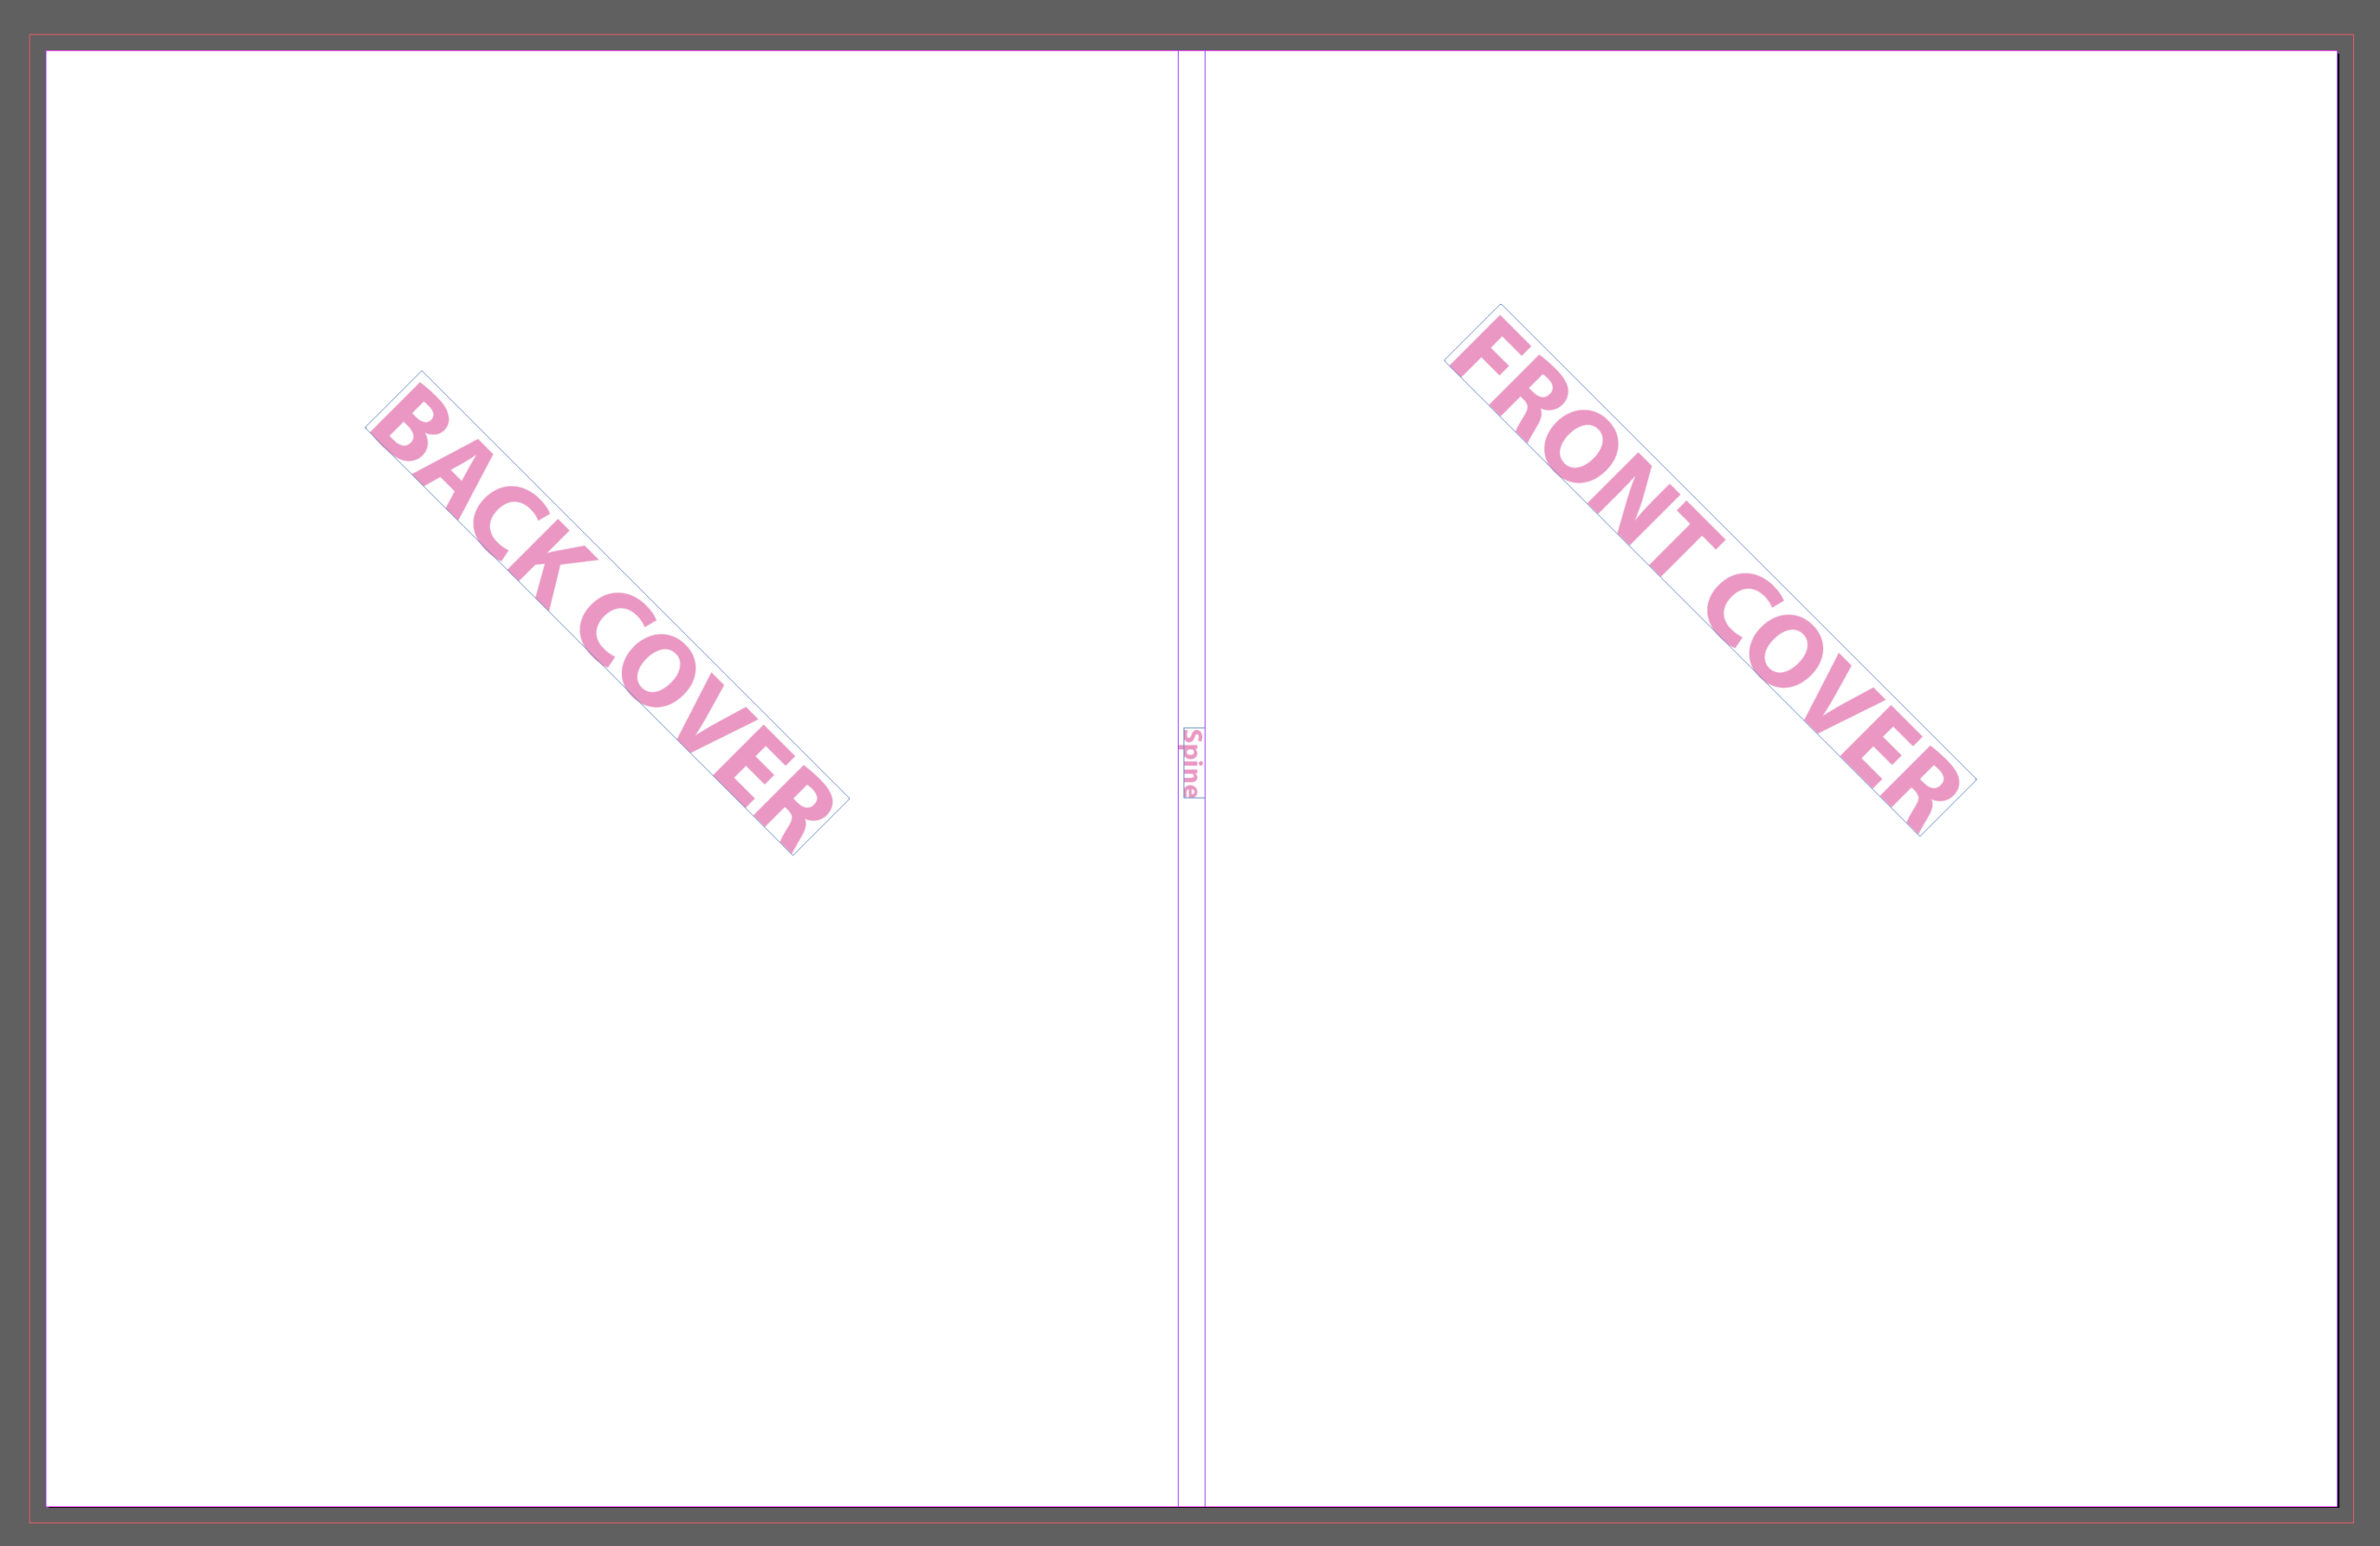
The book block is just the interior pages of the book. This is the width and height of your interior page.

Book Cover Spine Calculator

Nonstop Printing Cover Specs Calculator

Enter your options into the 4 boxes below and calculate your book specs for file setup. All measurements are in inches

Individual Paper Thickness (in):
#Pages (not sheets):
Book Block Width (in):
Book Block Height (in):

Softcover Specs :

Width in ‘document settings’  

Height in ‘document settings’  

Spine(Gutter in ‘margins and columns’ tab)  

White space for glue on inside cover  

Hardcover Specs :

Width in ‘document settings’  

Height in ‘document settings’  

Spine(Gutter in ‘margins and columns’ tab)  

Bleed (for wrap around)  

Foldout Specs :

Width Glue Side Panel  

Width Fold Out Panel  

Height Panel  

Hardcover Board Specs :

Board Widths  

Board Heights  

Spine Board Width  

Spine Board Height  

Printed Cover Final Dimension Width  

Printed Cover Final Dimension Height  

Perfect Binding

How to Use the Custom Book Cover Calculator​

We use this tool internally to create covers for softcover and hardcover books. You can do this process yourself to save time and design intentionally and speed up production times. Here’s an example of how we use it to create a standard 8.5×11 perfect bound book.

Step 1 - Calculate Specs with our Tool

In this example we have a book block that is printing on 100# sil k text. The thickness of each sheet is .0059″ (5.9pt). It’s 50 pages (page=numbered page as in a novel). The book size is 8.5×11. Input the values as shown below.

The values below are the calculated specs that we will insert into indesign’s setup page.

Step 2 - Insert Values in Indesign

Using the example, place the numbers in your Indesign Document Setup page as follows.

Note: Set the columns to 2. We use the “gutter” as the spine of the book.

Set bleeds to .125″. This sets a red outline so that you can place art all the way to the red line. This is so you do not get thin white lines in your final cover.

How Your Cover File Should Look

If you set up your values correctly, your Indesign document should look like the below image. We placed notes in magenta to show the placement for the front cover, back cover, and spine. If you have artwork that has ink all the way to the edge, make sure to place your artwork to the red line.

PDF Export Settings

Once you lay out your artwork, export a print PDF and use the following settings within the ‘Marks and Bleeds’ tab. The most important part is to have the bleed set to .125″ on all sides and make sure all the checkboxes remain unchecked in the marks section.

Your Cover File is Ready!

Once you lay out your artwork, export a print PDF and use the following settings within the ‘Marks and Bleeds’ tab. The most important part is to have the bleed set to .125″ on all sides and make sure all the checkboxes remain unchecked in the marks section.

Order Perfect Bound Books Online

See a digital preview of your book and order anytime at our Nonstop Docs portal.

nonstop new building

Get advice on your custom book project.

The best custom books start with a great conversation. We’ll help demystify the print process so you can choose the best method for your proejct.